Showing posts with label SharePoint Designer. Show all posts

Tuesday, April 19, 2016

SharePoint 2013 CSS not working in custom html page layouts

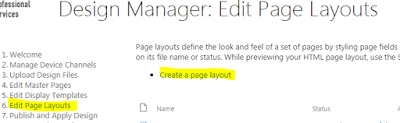
I have been customizing a SharePoint 2013 site, not in SharePoint 2010 way where we just copy paste the aspx file and edit it. I use Design Manager feature for branding the Master pages and Page layouts.


Once we create a page layout using Design Manager, a HTML file will be created. Then we open that HTML file using SharePoint Designer 2013 and edit it.

I faced an issue on editing the HTML page layout file. I wanted to hide the page title but failed !!!!!
This is what I did. I found the ID of the HTML tag and applied CSS inside the HTML page layout file.
After refreshing, I still see the page title. Because SharePoint 2013 appends CDATA where browsers ignore while rendering.

<style type="text/css">//<![CDATA[
.ms-long
{
   width: 100%;
}
//]]></style>

I tried many things and gave up. Then decided to create a page layout in SP 2010 way.
But lastly I wanted to try couple more times and found the solution.

This article helped me. https://msdn.microsoft.com/en-us/library/jj822367.aspx

In SharePoint 2013, the branding is completely different. We need to use the Design Manager Snippets. Therefore the above CSS should be rewritten as;

<!-- MS: <style type="text/css">-->
<!--
.ms-long
{
   width: 100%;
}
-->
<!-- ME: </style>-->

It worked !!!!! Happy day :)

Wednesday, September 30, 2015

SharePoint 2013 Send email to multiple users in designer workflow


Requirement: We need a form with fields Title, link, attachments and cc users. On form submit, an email notification should be sent to submitted user and CC to "CC Users"

Developer Solution:
1. Create a list / app with fields;
                                 Title - Single line of text
                                 Link - Hyperlink
                                 Attachments - OOTB
                                 CC Users - Person or Group (Allow Multiple)
 2. Create a designer workflow attached to that list

End Result: NO !!!!!!!!!!!!!!!!!!!

What Happened: If multiple users are present in "CC Users" column then SharePoint designer workflow sends an email to only ONE user. This is a major limitation in SharePoint.

Microsoft Support Response: If you want to send an email to dynamic multiple users then use either mention a group in people column or create a text column and enter the user's email address.
https://support.office.com/en-in/article/Send-e-mail-in-a-workflow-11d5f9dd-955f-412c-b70f-cde4214204f4

Developer Reaction: Whaaaaaaaaaaaaaaaaaaaaaaaaat !!!!!!!!!!!! :@

=======================                           ====================

Not to worry. I have found out a solution for this.

My Investigation: In SharePoint 2013, Once the name is resolved in people picker, DIV element is added dynamically with the ID "divEntityData". There is an another div inside it with the attribute "data". If you look at it carefully, you will see a XML with key-value pair nodes. It contains all necessary information like Title, Department, SIPAddress, Mobile and Email. I have attached a sample below [removed few keys since it is confidential ;) ]. That's it !!!!!!!!!!!! We can make use of it.

<ArrayOfDictionaryEntry xmlns:xsd="http://www.w3.org/2001/XMLSchema" xmlns:xsi="http://www.w3.org/2001/XMLSchema-instance">
<DictionaryEntry><Key xsi:type="xsd:string">Title</Key><Value xsi:type="xsd:string">Contractor: SevalHub</Value></DictionaryEntry>
<DictionaryEntry><Key xsi:type="xsd:string">Department</Key><Value xsi:type="xsd:string">IT</Value></DictionaryEntry>
<DictionaryEntry><Key xsi:type="xsd:string">Email</Key><Value xsi:type="xsd:string">dmahendranme@gmail.com</Value></DictionaryEntry>
</ArrayOfDictionaryEntry>

Solution for the same requirement:
1. Create a list / app with fields;
                                 Title - Single line of text
                                 Link - Hyperlink
                                 Attachments - OOTB
                                 CC Users - Person or Group (Allow Multiple)
                                 ccinternal - Multiple line of text (Hide this column to users)

2. Customize the NewForm and EditForm pages.
    - Add custom CSS class to both fields
    [NewForm.aspx sample below. I have added ccemail and ccinternal CSS classes. You should not copy this code. I added it for your reference.]

<tr>
    <td width="190px" valign="top" class="ms-formlabel">
    <H3 class="ms-standardheader">
        <nobr>CC Users</nobr>
    </H3>
    </td>
    <td width="400px" valign="top" class="ms-formbody ccemail">
    <SharePoint:FormField runat="server" id="ff14{$Pos}" ControlMode="New" FieldName="ccusers" __designer:bind="{ddwrt:DataBind('i',concat('ff14',$Pos),'Value','ValueChanged','ID',ddwrt:EscapeDelims(string(@ID)),'@ccusers')}"/>
    <SharePoint:FieldDescription runat="server" id="ff14description{$Pos}" FieldName="ccusers" ControlMode="New"/>
    <span class="tip">Enter name(s) of person(s) to receive a copy of this request</span>
    </td>
</tr>

<tr class="ms-hidden"><!-- class="ms-hidden" is to hide our ccinternal field from end users -->
    <td width="190px" valign="top" class="ms-formlabel">
    <H3 class="ms-standardheader">
        <nobr>ccinternal</nobr>
    </H3>
    </td>
    <td width="400px" valign="top" class="ms-formbody ccinternal">
    <SharePoint:FormField runat="server" id="ff22{$Pos}" ControlMode="New" FieldName="ccinternal" __designer:bind="{ddwrt:DataBind('i',concat('ff22',$Pos),'Value','ValueChanged','ID',ddwrt:EscapeDelims(string(@ID)),'@ccinternal')}"/>
    <SharePoint:FieldDescription runat="server" id="ff22description{$Pos}" FieldName="ccinternal" ControlMode="New"/>
    </td>
</tr>

3. Place the below Javascript function in the page. If you are referencing .js then place it in that file.
    [jQuery is used]

function insertccemail()
{
    var emails='';
    $('.ccemail #divEntityData').each(function(){
        var x = $.parseXML($(this).find('div').attr('data'));
        var profiles = x.getElementsByTagName("DictionaryEntry");
        $.each(profiles, function (index, value){if($(value).find('Key').text()=='Email') if($(value).find('Value').text()!='') emails+=$(value).find('Value').text()+'; ';});
    });

    $('.ccinternal textarea').text(emails); // Used textarea because I have created Multiple line of text field for ccinternal

} // insertccemail - Ends


//alert(profiles[0].getElementsByTagName("Value")[0].childNodes[0].nodeValue);  - In Javascript. This alert sample which I tried for testing.

4. Call this insertccemail() function in PreSaveAction(). This PreSaveAction function should be placed inside the form only. You should not place it in .js file and refer it.

function PreSaveAction()
{
    insertccemail();
    if(ValidateFields()) //Never mind. ValidateFields() is a custom Javascript function to validate my fields on Save
       return true;
    else
       return false;
} // PreSaveAction - Ends

5. In designer workflow, refer the "ccinternal" column in CC field.


We are Creators.  Happy Thinking ! :)


Tuesday, September 8, 2015

SharePoint change context menu to other column instead of Title column in View pages

In SharePoint, we can create new View for Lists and Libraries and select the columns that we want to show.
Most of us do not use Title column in List / Libraries. Therefore in views, we use to hide the Title column and SharePoint OOTB provides the context menu for Title column.
Then how does the business user handle the item without context menu !!!!!!!!!! ?

Solution: We need to customize the view in SharePoint Designer.

1. Open the view in Designer (Eg: AllItems.aspx)
2. Goto view and identify your column. Here I have chosen "CustomColumn".
3. Add the below lines inside FieldRef of that column.

LinkToItem="TRUE" LinkToItemAllowed="Required" ListItemMenu="TRUE"

4. Save the view. That's it !!!!! :) 

Friday, June 26, 2015

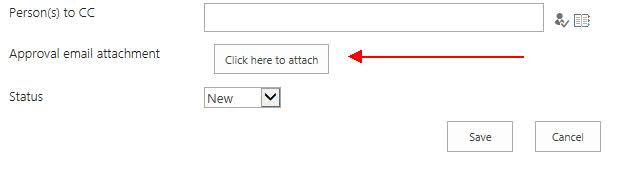
SharePoint custom list form with custom attach file button

I had a requirement where user wanted to attach a file to list item. Well, that's normal thing for user and easy too but they do not want to click the "Action file" button at Ribbon.

User wanted a button on list form to attach a file !!!!!!!!!!!

Being a master in jQuery, I thought I would be able to grab the click function and assign it to custom button. I was trying trying trying..... > <  Uuh ! No use with several tricks performed. 

Later I came across a SharePoint javascript function "UploadAttachment()". Boooooooom ! It's done.
Very easy solution. 

<input type="button" value="Click here to attach" onclick='UploadAttachment()'></input>

Custom list form:


Friday, March 22, 2013

Getting Query String Values using JavaScript in SharePoint


The JSRequest class is a JavaScript object that lives on all SharePoint Pages, and allows us to simply and quickly get query string values using JavaScript.

It has 3 fields: QueryString, FileName, and PathName.
  • QueryString - is an array of key\value pairs representing the current query string parameters.
  • FileName - is a string containing the current name of the current page.
  • PathName - is the server relative path of the current page.
Usage:

//First we must call the EnsureSetup method
JSRequest.EnsureSetup(); 

//Get a query string parameter called Id. i.e - "page.aspx?Id=11" will return 11
itemId = JSRequest.QueryString["Id"];

//Get the current page name. i.e - "default.aspx"
itemId = JSRequest.FileName;

//Get the current path name. i.e - "/itaysk/doclib/default.aspx"
itemId = JSRequest.PathName;


Ref: http://blogs.microsoft.co.il/blogs/itaysk/archive/2008/11/30/getting-query-string-parameters-with-javascript-in-sharepoint.aspx

https://www.nothingbutsharepoint.com/sites/devwiki/SP2007Dev/Pages/SharePoint%20JavaScript%20Functions%20Overview.aspx

Pass parameter to redirect url in GenFireServerEvent SharePoint 2010


Many users try to redirect the page to custom page with custom query string after clicking the save button in list forms. Most of the websites give below solution to use custom button which just redirect to page.


Instead of using the default sharepoint buttons:

<SharePoint:SaveButton runat="server" ControlMode="Edit" id="savebutton1" Text="OK"/>

<SharePoint:GoBackButton runat="server" ControlMode="Edit" id="gobackbutton2"/>


replace them with this:

<input type="button" class="ms-ButtonHeightWidth" value="OK" name="btnSave" onclick="javascript: {ddwrt:GenFireServerEvent('__commit;__redirect={}')}" />


<input type="button" class="ms-ButtonHeightWidth" value="Cancel" name="btnCancel" onclick="javascript: {ddwrt:GenFireServerEvent('__redirect={}')}" />


Note:
       - You can put any URL in __redirect={} that you want, for example __redirect={http://www.google.com} or __redirect={/news/PressReleases/}
       - There should be no quotes around the URLs passed into the __redirect directive.

The above solution works fine when you have static pages. But how can you pass parameter to redirect url? 

Consider; I have a page "listPage.aspx" with two radio button(View, Update), one save button and one cancel button. User opens "listPage.aspx" page and selects either View or Update radio button and clicks on save. I need to redirect the page based on the user selected value in query string like "Admin.aspx?action=<selected value>". 

Solution to pass parameter to redirect url:

1. Include jQuery reference in your list form using SharePoint Designer. In our case, page is "listPage.aspx".
2. Replace the SharePoint default buttons with input field. Eg: 

<input class="ms-ButtonHeightWidth" id="btnSave" onclick="javascript: {ddwrt:GenFireServerEvent('__commit;__redirect={}')}" type="button" value="OK" />


<input class="ms-ButtonHeightWidth" id="btnCancel" onclick="javascript: {ddwrt:GenFireServerEvent('__redirect={/Pages/Home.aspx}')}" type="button" value="Cancel" />


3. Place the below script inside contentplaceholders. [Tip: look for script tag in the page and place the code]

$(document).ready(function () {
  $("input:radio[name=theme]").change(function() {
    var value = $(this).val();
var onclick=$('#btnSave').attr('onclick');
onclick=onclick.split('{')[0]+'{/Pages/Admin.aspx?action='+value+'}\')';
$('#btnSave').attr('onclick',onclick);
});

});

Here "theme" is the radio button group name. 

Thats it !!!!! You are done!

The code 

var onclick=$('#btnSave').attr('onclick');
onclick=onclick.split('{')[0]+'{/Pages/Admin.aspx?action='+value+'}\')';
$('#btnSave').attr('onclick',onclick);

plays the trick, manipulates the button's onclick attribute value.